Last Updated on
Now that you’ve signed up for hosting and installed WordPress, it’s time to log into the back-end of your blog and choose a theme. Any time you want to log in and do anything with your blog, whether it be writing a new post or simply adding a picture, you’ll need to go to the url that I told you to write down in the last step. Basically, that means adding a wp-admin to the end of your root url. Using the example of my site, I would type the following into my browser:
http://www.thecincinnatihandyman.com/wp-admin
You should then see something like this on your screen:

Enter the username and password that you wrote down from the last step and press the blue “Log In” button.
Choose A Theme
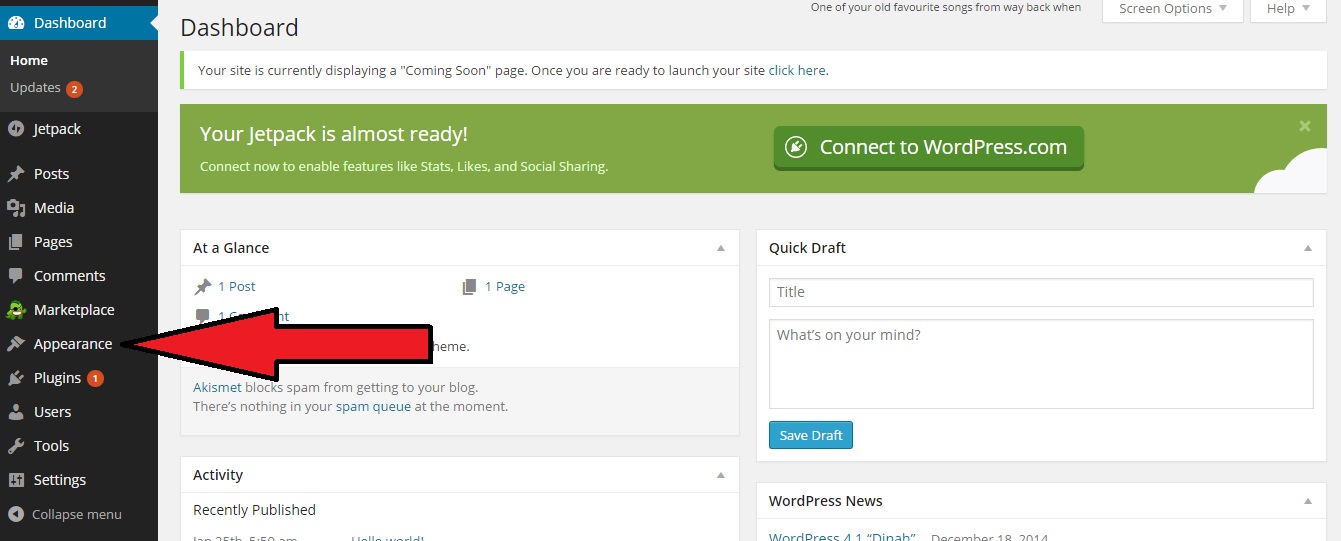
Welcome to the back-end (administrative area) of your new blog! You’ll see the page below. Now let’s choose a theme. Click on “Appearance” in the left sidebar:
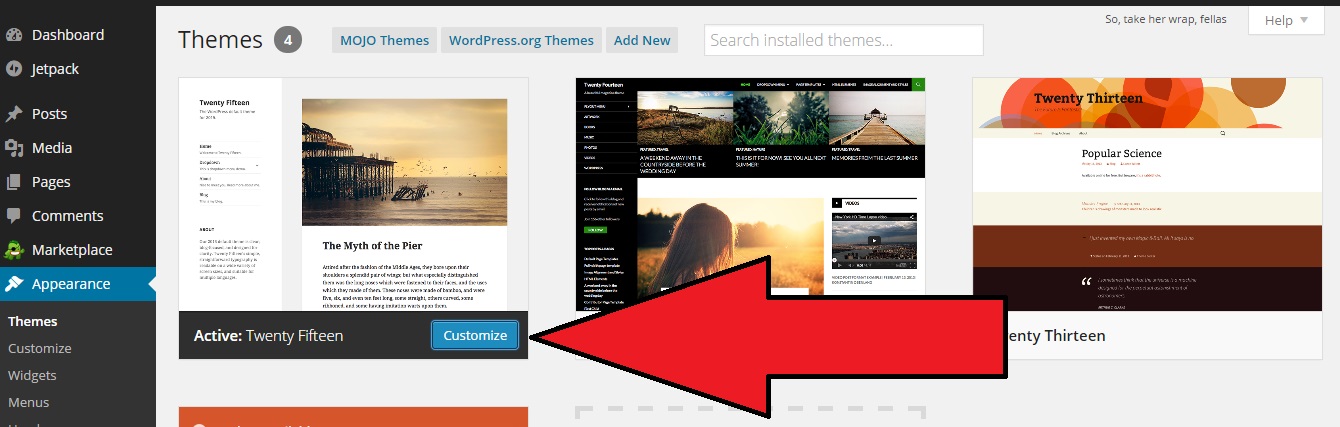
By default, the “Twenty Fifteen” theme is already activated for you, but there are many other options to choose from if you so desire. It’s all about personal taste, but for now I recommend starting with the Twenty Fifteen theme as it’s free, easy to read, and responsive to different devices (meaning that people who find your blog will easily be able to read it even if they’re using a smartphone or tablet). You can always switch to another theme later, and if you do all the posts and pages you’ve created will transfer over to the new theme so you don’t have to write them all over again.
So, let’s assume you’re using the Twenty Fifteen theme. Click the blue button that says “Customize”:
Now you can begin to shape the look and feel of your new blog, and remember that you can always adjust any of these options later. After you click the blue customize button (as depicted above), you’ll be taken to the homepage of you new blog with a customizer series of menus along the left side of your screen. For now let’s just walk through a couple basic things that will get you up and running quickly:
- Site Title & Tagline. This should be pretty straight-forward. For my blog I will give it the title of “The Cincinnati Handyman” and my tagline will be a contact phone number. I don’t have this set up yet so for now I’ll just fill it with the number (555) 555-5555.
- Static Front Page. Under this setting you’ll want to make sure that you select “A static page” and NOT “Your latest posts”. Under “Front page” select “Sample Page” in the dropdown menu. This gives you the opportunity to create more of sales-oriented home page that instantly gives new visitors vital information about you and your company. The blog posts will serve as more of a backdrop, at least for people who find you through your home page.
Now press the blue “save and publish” button. Eventually you can come back to this point and have fun adjusting your colors, your header image, and the widgets, but for now let’s keep moving through the essentials. Next press the “x” button in the upper left corner of the screen.
Next, click on “Settings” in the left menu bar, then on “Permalinks”. Instead of using the default setting here I want you to select the “Post name” option, then click the blue “Save Changes” button at the bottom of the page. This one simple tweak will do wonders to help your search engine rankings.
Install Plugins
There are literally thousands of plugins to choose from in the WordPress universe, and you will no doubt find ones that serve your unique needs as time goes on, but for now let’s just install a few that I feel are crucial for any new blog. Click the “Plugins” link in the left menu bar in your main dashboard. Then click “Add New”. Use the search box to locate and install the following two plugins (and, yes, activate them, too!):
- All in One SEO Pack. After activating, click the “options configuration panel” link. This plugin is pretty much ready to go right out of the box, but I highly recommend that you scroll down to the “Home Page Settings” and fill in the three boxes. For “home title” I will enter “The Cincinnati Handyman | Cincinnati Home Repair Service”. It’s very important that you have your city name and main service represented in this text box. In the “home description” box, give a brief summary of who you are, what you do, and what the blog is about. It would be a good idea to once again work in your city name and main service somewhere in this area. Also put your company phone number in this area if you have room. This is the description that search engines visitors will see below your home title when your blog is listed in search results. For now, I’m going to put the following text in this area for my new blog: “The official blog of The Cincinnati Handyman, Cincinnati’s most trusted and professional home repair service. Call today for a free assessment: (555) 555-5555.” Finally, you need to add a few phrases in the “Home Keywords” box. These should be a few relevant phrases about the main services you offer and their synonyms. Don’t go too crazy here. I would say a max of five or six phrases. For my example I will be using: “cincinnati handyman, cincinnati home repair, cincinnati home maintenance”. Be sure to put a comma between each phrase. Now scroll back up to the top of the page and click the blue “Update Options” button. Now your on-site seo is good to go.
- Contact Form 7. The creator of this plugin wrote a concise and excellent walk-through for how to set up your contact page, and you can check it out by clicking here.
Now….Start Blogging!
If you’ve followed this guide to a “t” then your blog’s foundation is now set on solid ground and ready for you to build out the rest. By the “rest”, I mean adding posts, pages, images, and possibly video.
The folks with WordPress have put together countless tutorials on some of the basics of blogging with their platform. Here are a few that will help you get going:
- How To Create A Post
- How To Create A Page
- How To Add Images To Posts and Pages
- How to Embed Video In Posts and Pages
Once you get these basics down and start creating content you’ll be surprised by how quickly your blog will come to life. Like with most things, the more effort you put into your blog, the more you will get back out of it in the long run. If you write half-ass posts that aren’t very helpful to anyone then you’re not going to get super results. The people who really see game-changing results to their company’s sales numbers are the ones who roll up their sleeves and challenge themselves to make their blog as awesome as possible.
“But…I’m a terrible writer!”
If you like the idea of having a blog but feel that your writing skills are poor, don’t give up! There are plenty of ways around this. The most obvious would be to have somebody else write them for you. Can your spouse turn a good phrase? Ask her (or him) if they will spend some time to help you put the posts together. Explain the potential monetary benefits to them and they should have no problem helping you out. If that’s not an option then perhaps you have a son, daughter, nephew, or cousin who can write. Offer to pay them for their services. If the writing is quality then the investment will pay for itself many times over. If all else fails, you can always hire a writer at Elance.
The bottom line is to make the information on your blog as useful, comprehensive, and persuasive as possible. One final note here: DO NOT COPY FROM OTHER INTERNET SOURCES. This might sound like an attractive short-cut to filling up your blog with lots of content, but it’s a TERRIBLE idea. Not only will this tick off the original author, but they might also come after you, legal guns a-blazin’. It’s basically stealing. You’re taking somebody else’s stuff and passing it off as your own. Not cool. To add insult to injury, if you do this kind of thing then it will seriously hurt your stance in the eyes of the google algorithm, and your chances of showing up in the search results will be slim to none. Make sure the content on your site is ORIGINAL and you’ll be fine.
“What The Heck Do I Write About?”
Any and everything related to your service! Have a brainstorming session with your spouse or business partner and you’ll be amazed how many ideas you can come up with. For example, let’s say you run a remodeling business. Here’s a short list of ideas I came up with in about three minutes of brainstorming:
- How To Pick A Qualified Contractor For Your Major Kitchen Remodel
- The Top Five Home Improvement Projects For Increasing Resale Value
- The Pros and Cons of Radiant Floor Heating In Your Bathroom
- Home Upgrades That Pay For Themselves By Reducing Energy Consumption
- How To Best Utilize Space When Finishing A Basement
The possibilities are endless. Just write about what you know…you might be surprised how easily the ideas come to you once you get going.
A few more tips and tricks for writing posts that pull in search engine traffic:
- When possible (and with the homeowner’s permission), take pictures of a project that turned out particularly well and create a post about it. Make sure the TITLE of the post includes the name of the exact SUBURB or area of town where you were working (not the larger city name). So, the title could be “New Deck Installation in {suburb name here} Leaves Customer Stunned”. Include pictures of the amazing new deck you built, brag about all the included features, and talk about how happy the customer was. It’s easy to create a whole post about work that you’re proud of.
- Create posts that answer questions you often hear from your customer base. If it seems like people are always asking you what the difference is between corian and granite then odds are good that lots of people are asking that same question on the internet! Write a post dedicated exclusively to that topic and it will bring traffic to your site.
- The longer the post, the better. There’s nothing wrong with a 300-word post here and there, but what I’ve discovered is that longer posts tend to pull in more traffic. Aim for 600 words or more if you can do so without rambling or repeating yourself. Your traffic stats will thank you.
It’s time to start writing and pulling in those leads!
Have questions? Comment below or shoot me an email. You can also check out the blog that I set up during this tutorial (The Cincinnati Handyman) to see how it’s coming along and how I’m going to build it into a monster lead generator.
For those of you that used this guide to start a blog or who already have a blog, please leave a comment below to tell me about it. Feel free to leave a link to it, as well. I’d love to see what you all are creating out there, and in a follow-up post I plan on highlighting five or ten of you who are really crushing it with your blog!
 My name is Jeff and I created this blog in 2007 to help and inspire contractors and home service providers. It’s come a long way since then.