≡ Menu

I haven’t talked a whole lot about real estate on The Rich Contractor, but it’s time to change that.  It’s time to talk about one of the best and most amazing ways you can capitalize on your trade skills to dramatically increase your net worth over time.  And, guess what?  You don’t have to deal with a single customer or even travel beyond your local Home Depot to execute this technique.  And you can take as long as you want to finish the job.  At the edge of your seat yet?  Basically, I’m talking about rehabbing your OWN home in a smart and calculating way to quickly boost your equity (and for the sake of this post I’m going to include home equity in the calculation of net worth).

The FHA 203k Loan Is Flipping Amazing

Several years ago my wife and I bought a home with the FHA 203k loan program, and though the process was a bit tedious, we look back on it now as one of the best decisions we’ve ever made.  Essentially, the 203k loan allows you to build in the cost of renovations into your overall home loan.  Thus, the total loan amount is a calculation of the purchase price of the property plus an amount to cover labor and material costs to rehab the house.  I believe the down payment was somewhere around 3.5%, and it should be noted that all FHA loans come with the additional pleasure of mortgage insurance, but this is a small price to pay in my opinion.

The house we purchased was in some major need of TLC.  Built 1956, there were many needed repairs and updates that had simply been overlooked by previous owners.  So, we rolled up our sleeves and went to town.  Some of the work I did myself.  Some of it I hired out to other contractors.

In about eight weeks the following list of things were done to our “new” residence:

  • New Roof
  • New Siding and Gutters
  • All New Windows
  • New Electrical Panel
  • New Kitchen
  • New Exterior Basement Stairwell
  • Lots of Painting and Tile Work
  • Random Clean-Up and Touch Up

Now, don’t get me wrong.  Those eight weeks were a bit stressful and chaotic, but when it was all said and done there was an enormous sense of satisfaction that we had just turned a run-down handyman special into a one of the nicest homes in the neighborhood.  No longer was it the eyesore of the block that every neighbor cringed at while driving past.

Better still was the fact that we had just skyrocketed the home’s value, which essentially amounted to roughly $35,000 in near-instant equity.  As time has gone on that margin between what the house is worth and what we owe has continued to fatten, a result of rising prices and additional improvements that included a complete bathroom remodel.  Suffice it to say that we are going to walk away with a very large check when we finally do sell.

Rinse and Repeat.  Rinse and Repeat.  Have an Extra $4,000,000 in the Bank Come Retirement.

But, the story doesn’t have to end there.  My wife and I like the neighborhood and the house and have decided  to hang tight for now.  But, this process can be repeated over and over again.  As long as you live in the residence for two years before selling it, all profits are 100% tax free (up to a max of $250,000).  For the average person this can be a great way to build net worth, but for the contractor who has mad home improvement skills this is a scenario that can produce absolutely mind-blowing results!  Why?  Because you don’t have to pay for labor, and as a professional contractor you’ll likely have access to materials at a cost that is well below retail.

Consider this hypothetical scenario.  Smart contractor “Joe” decides to buy a piece of crap house with a 203k loan in an otherwise nice neighborhood as his primary residence.  He’s made the intelligent move of finding an area of town where appreciation outpaces the rest of the city as a result of good schools, services, and facilities.  He’s going to renovate it whenever there is free time and then sell it after two years.  Just for the sake of simplicity, let’s say he does this ten times over the course of twenty years.  Granted, that’s a lot of moving around, but it’s really the only downside to this strategy.  Let’s say the average purchase price per home is $150,000 with a build-in of $50,000 for improvements.  That amounts to a total loan of $200,000.  Each time, Joe is able to use his amazing skills to renovate the home, which results in a sale price two years later of $300,000.  Each time he’s able to sock $100,000 of pure, un-taxed profit into his bank account.  He does this ten times.  After 20 years he has a cool million in the bank.

This is IN ADDITION to any savings he has from his actual job (or business) as a carpenter/remodeler/builder/etc.  Of course if he’s smart he’s plowing the extra $100,000 per sale into retirement accounts and/or rental properties during those 20 years, so it should actually be worth WELL over a million after 20 years (probably closer to four million, actually).  This stuff isn’t rocket science – it’s just a matter of having a plan and executing.

For the nit-pickers out there, yes I realize that this example is a gross oversimplification of the process.  Profits per sale will range wildly based on economic conditions and housing trends.  And Joe is unlikely to stay put for only two years in each location, but fundamentally this strategy really works.  Depending on swings in real estate values it could take 15 years or it could take 30, but OVER TIME this is a fantastic way to accumulate wealth over a lifetime.

Trade skills plus real estate knowledge equals early retirement.  You just have to want it.

{ 0 comments }

I know a woman who is the owner and operator of a lawn care business and who charges a good 25-35% more for her services than almost anyone else.  Her business, though seasonal, is absolutely rocking.  I recall last year she had trouble keeping up, and had to start bringing in help because there simply weren’t enough hours in the day.  I believe that there were many days when she was grossing $500 or more by herself, just from mowing grass.

It got me wondering…

Does this same phenomenon apply across the board to all home service niches?  If so, why?  I don’t know the answer to the first question, but I’d like to get some feedback in the comment section from you guys (and especially gals).  What have your experiences been with this?

If indeed it does apply to multiple specialties, I would assume it has something to do with trust.  It’s no secret that a big part of having a successful home services business is having the ability to put clients at ease.  They need to be assured that when you come to their home you are going to treat them, their family, and their property with respect and kindness.  And, well, men are viewed as more of a potential physical threat than are women…it’s just the reality of the world.

I’m sure you can see where I’m going with this:

Why Aren’t More Contractors And Service Providers Hiring Women?

I think, at least in some industries, you’d make a lot more money!  I know it’s hard to find good people who don’t mind physical labor in the first place, and (in general) women probably tend to be drawn more to jobs that involve a different set of skills (more mental and less physical), but it’s not an impossible task.  My lawn care friend is the perfect example of this.  If simply having a female or two out in the field (or at least doing sales) has the potential to boost margins by such a tremendous amount then why not make more of an effort to recruit them or to set up training programs specifically for them?

Is it just sexism?  What’s the deal?

{ 2 comments }

Now that you’ve signed up for hosting and installed WordPress, it’s time to log into the back-end of your blog and choose a theme.  Any time you want to log in and do anything with your blog, whether it be writing a new post or simply adding a picture, you’ll need to go to the url that I told you to write down in the last step.  Basically, that means adding a wp-admin to the end of your root url.  Using the example of my site, I would type the following into my browser:

http://www.thecincinnatihandyman.com/wp-admin

You should then see something like this on your screen:

wp login page

Enter the username and password that you wrote down from the last step and press the blue “Log In” button.

Choose A Theme

Welcome to the back-end (administrative area) of your new blog!  You’ll see the page below.  Now let’s choose a theme.  Click on “Appearance” in the left sidebar:

pick theme

By default, the “Twenty Fifteen” theme is already activated for you, but there are many other options to choose from if you so desire.  It’s all about personal taste, but for now I recommend starting with the Twenty Fifteen theme as it’s free, easy to read, and responsive to different devices (meaning that people who find your blog will easily be able to read it even if they’re using a smartphone or tablet).  You can always switch to another theme later, and if you do all the posts and pages you’ve created will transfer over to the new theme so you don’t have to write them all over again.

So, let’s assume you’re using the Twenty Fifteen theme.  Click the blue button that says “Customize”:

customize-theme

Now you can begin to shape the look and feel of your new blog, and remember that you can always adjust any of these options later.  After you click the blue customize button (as depicted above), you’ll be taken to the homepage of you new blog with a customizer series of menus along the left side of your screen.  For now let’s just walk through a couple basic things that will get you up and running quickly:

  • Site Title & Tagline.  This should be pretty straight-forward.  For my blog I will give it the title of “The Cincinnati Handyman” and my tagline will be a contact phone number.  I don’t have this set up yet so for now I’ll just fill it with the number (555) 555-5555.
  • Static Front Page.  Under this setting you’ll want to make sure that you select “A static page” and NOT “Your latest posts”.  Under “Front page” select “Sample Page” in the dropdown menu.  This gives you the opportunity to create more of sales-oriented home page that instantly gives new visitors vital information about you and your company.  The blog posts will serve as more of a backdrop, at least for people who find you through your home page.

Now press the blue “save and publish” button.  Eventually you can come back to this point and have fun adjusting your colors, your header image, and the widgets, but for now let’s keep moving through the essentials. Next press the “x” button in the upper left corner of the screen.

Next, click on “Settings” in the left menu bar, then on “Permalinks”.  Instead of using the default setting here I want you to select the “Post name” option, then click the blue “Save Changes” button at the bottom of the page.  This one simple tweak will do wonders to help your search engine rankings.

Install Plugins

There are literally thousands of plugins to choose from in the WordPress universe, and you will no doubt find ones that serve your unique needs as time goes on, but for now let’s just install a few that I feel are crucial for any new blog.  Click the “Plugins” link in the left menu bar in your main dashboard.  Then click “Add New”.  Use the search box to locate and install the following two plugins (and, yes, activate them, too!):

  • All in One SEO Pack.  After activating, click the “options configuration panel” link.  This plugin is pretty much ready to go right out of the box, but I highly recommend that you scroll down to the “Home Page Settings” and fill in the three boxes.  For “home title” I will enter “The Cincinnati Handyman | Cincinnati Home Repair Service”.  It’s very important that you have your city name and main service represented in this text box.  In the “home description” box, give a brief summary of who you are, what you do, and what the blog is about.  It would be a good idea to once again work in your city name and main service somewhere in this area.  Also put your company phone number in this area if you have room.  This is the description that search engines visitors will see below your home title when your blog is listed in search results.  For now, I’m going to put the following text in this area for my new blog: “The official blog of The Cincinnati Handyman, Cincinnati’s most trusted and professional home repair service. Call today for a free assessment: (555) 555-5555.”  Finally, you need to add a few phrases in the “Home Keywords” box.  These should be a few relevant phrases about the main services you offer and their synonyms.  Don’t go too crazy here.  I would say a max of five or six phrases.  For my example I will be using: “cincinnati handyman, cincinnati home repair, cincinnati home maintenance”.  Be sure to put a comma between each phrase.  Now scroll back up to the top of the page and click the blue “Update Options” button.  Now your on-site seo is good to go.
  • Contact Form 7.  The creator of this plugin wrote a concise and excellent walk-through for how to set up your contact page, and you can check it out by clicking here.

Now….Start Blogging!

If you’ve followed this guide to a “t” then your blog’s foundation is now set on solid ground and ready for you to build out the rest.  By the “rest”, I mean adding posts, pages, images, and possibly video.

The folks with WordPress have put together countless tutorials on some of the basics of blogging with their platform.  Here are a few that will help you get going:

Once you get these basics down and start creating content you’ll be surprised by how quickly your blog will come to life.  Like with most things, the more effort you put into your blog, the more you will get back out of it in the long run.  If you write half-ass posts that aren’t very helpful to anyone then you’re not going to get super results.  The people who really see game-changing results to their company’s sales numbers are the ones who roll up their sleeves and challenge themselves to make their blog as awesome as possible.

“But…I’m a terrible writer!”

If you like the idea of having a blog but feel that your writing skills are poor, don’t give up!  There are plenty of ways around this.  The most obvious would be to have somebody else write them for you.  Can your spouse turn a good phrase?  Ask her (or him) if they will spend some time to help you put the posts together.  Explain the potential monetary benefits to them and they should have no problem helping you out.  If that’s not an option then perhaps you have a son, daughter, nephew, or cousin who can write.  Offer to pay them for their services.  If the writing is quality then the investment will pay for itself many times over.  If all else fails, you can always hire a writer at Elance.

The bottom line is to make the information on your blog as useful, comprehensive, and persuasive as possible.  One final note here: DO NOT COPY FROM OTHER INTERNET SOURCES.  This might sound like an attractive short-cut to filling up your blog with lots of content, but it’s a TERRIBLE idea.  Not only will this tick off the original author, but they might also come after you, legal guns a-blazin’.  It’s basically stealing.  You’re taking somebody else’s stuff and passing it off as your own.  Not cool.  To add insult to injury, if you do this kind of thing then it will seriously hurt your stance in the eyes of the google algorithm, and your chances of showing up in the search results will be slim to none.  Make sure the content on your site is ORIGINAL and you’ll be fine.

“What The Heck Do I Write About?”

Any and everything related to your service!  Have a brainstorming session with your spouse or business partner and you’ll be amazed how many ideas you can come up with.  For example, let’s say you run a remodeling business.  Here’s a short list of ideas I came up with in about three minutes of brainstorming:

  1. How To Pick A Qualified Contractor For Your Major Kitchen Remodel
  2. The Top Five Home Improvement Projects For Increasing Resale Value
  3. The Pros and Cons of Radiant Floor Heating In Your Bathroom
  4. Home Upgrades That Pay For Themselves By Reducing Energy Consumption
  5. How To Best Utilize Space When Finishing A Basement

The possibilities are endless.  Just write about what you know…you might be surprised how easily the ideas come to you once you get going.

A few more tips and tricks for writing posts that pull in search engine traffic:

  • When possible (and with the homeowner’s permission), take pictures of a project that turned out particularly well and create a post about it.  Make sure the TITLE of the post includes the name of the exact SUBURB or area of town where you were working (not the larger city name).  So, the title could be “New Deck Installation in {suburb name here} Leaves Customer Stunned”.  Include pictures of the amazing new deck you built, brag about all the included features, and talk about how happy the customer was.  It’s easy to create a whole post about work that you’re proud of.
  • Create posts that answer questions you often hear from your customer base.  If it seems like people are always asking you what the difference is between corian and granite then odds are good that lots of people are asking that same question on the internet!  Write a post dedicated exclusively to that topic and it will bring traffic to your site.
  • The longer the post, the better.  There’s nothing wrong with a 300-word post here and there, but what I’ve discovered is that longer posts tend to pull in more traffic.  Aim for 600 words or more if you can do so without rambling or repeating yourself.  Your traffic stats will thank you.

It’s time to start writing and pulling in those leads!

Have questions?  Comment below or shoot me an email.  You can also check out the blog that I set up during this tutorial (The Cincinnati Handyman) to see how it’s coming along and how I’m going to build it into a monster lead generator.

For those of you that used this guide to start a blog or who already have a blog, please leave a comment below to tell me about it.  Feel free to leave a link to it, as well.  I’d love to see what you all are creating out there, and in a follow-up post I plan on highlighting five or ten of you who are really crushing it with your blog!

{ 0 comments }

Okay, so if you’ve made it to this post then you should have already read the previous two posts in this series: How To Start A Successful Blog For Your Business and Choosing A Domain Name For Your Business Blog.  If you haven’t, go back and read those first.  Then jump back to this post, where I’ll be giving you a step-by-step guide for registering a domain name and setting up hosting for your blog.

I’m actually going to let you follow along as I do this for MYSELF.  I’m toying with the idea of starting a local handyman service as a complement to my other business interests, and so you’re about to get an exclusive peek over my shoulder as I go through the process of starting up MY new blog.

Step 1: Take out a pen and pad and write down at least five ideas for your blog’s domain name.  Remember the general guidelines I laid out in my previous post.  Using my own rules I came up with these five:

  1. CincinnatiHandyman.com
  2. CincinnatiHandymanService.com
  3. CincinnatiHandymanServices.com
  4. HesterHandymanCincinnati.com
  5. TheCincinnatiHandyman.com

Step 2: Click here to go to Bluehost.com.  The landing page I’m sending you to should look similar to this:

Click the green button that says “get started now”.

Step 3: Select the hosting plan that best suits your needs.  The starter package is good enough for what we’re trying to do here, but if you will be starting more than one blog  (if you have more than one business, for example) then it would be smart to get the plus or business pro plan:

bluehost-step-3-select-planFor my new blog I’ll be selecting the starter plan.

Step 4: Register your free domain name.  In the left box titled “new domain”, start entering the domain names that you came up with in step one.  Bluehost will tell you which names are available and which ones have already been registered by someone else.

bluehost-step-4-select-domain

The first three on my list were already taken.  HesterHandymanCincinnati.com is available but it looks a bit long and is not very memorable.  TheCincinnatiHandyman.com is also available, and I like that it has both my city and service in it.  It’s also shorter and will probably be easier for people to remember.  So that’s the domain I’m going with.

Step 5: Enter your account, package, and billing information.  The top of the page will look something like this:

bluehost-step-5

After you’ve entered your general account information you’ll be presented with package options to choose from.  Select the plan from the drop-down menu that best suits your needs.  There are other upgrades available here to choose from if you are so inclined.  It just depends on what you want and your particular situation.  As for me, I won’t be needing any of these so I unchecked all the boxes:

bluehost-step-5-picB

Finally, enter your billing information and click the green “next” button.

Step 6: You’ll be presented with a number of available upgrades for your account.  You don’t need any of them, but if something looks useful to you then be my guest.  I’ll be skipping them all and clicking the green “complete” button at the bottom of the page:

bluehost-step-6


Step 7: Create an account password.  First, click the blue button that says “create your password”:

bluehost-step-7-passwordcreate-final

Now click the box that says you agree to the terms of service, choose a password, and click the green “create” button:

bluehost-step-7-password-part2

Step 8: Log in to your account.  Use the password you just created and click the blue “submit” button:

bluehost-step-8

Step 9: Click the “Hosting” tab near the upper-left corner of the page:

bluehost-step-9

Step 10: Click the “wordpress” icon under “website builders”:

bluehost-step-10

Step 11: Install WordPress.  A new tab will open and you’ll be taken to a site called mojomarketplace.com.  It should look similar to the image below.  Click on the green “install” button:

bluehost-step-11

Step 12: Click the green button that says “Check Domain”.  Don’t change anything in the dropdown menu!  Just leave it alone and hit that green button:

bluehost-step-12

Step 13: Check the box to accept the terms and conditions and click the green “install now” button.  You don’t need to check the “advanced options” box:

bluehost-step-13

Step 14: Find your blog’s login credentials.  Click the black box in the upper-right corner that says “View Credentials”:

bluehost-step-14

Next, scroll down a bit and click the link that says “View”:

bluehost-step-14b

Now you’ll be shown your unique blog login credentials.  This information is very important.  Write it down or save it in a protected spreadsheet!

bluehost-step-14cfinal


Your blog setup is now finished.  Woo hoo!  If you had any problems along the way or need help getting this set up just contact me – I’d love to help!

Next step: Pick A Theme, Configure WordPress, and Start Writing!

Please Note: Some of the links above are affiliate links that will provide me a commission (at no additional cost to you). I am not recommending these products and services because of the commission I would earn but rather because I know they are helpful and are companies that I find to be competent and trustworthy.

{ 0 comments }

Choosing the right domain name for your business blog is very important.  This is not a decision to make hastily.  The domain name is the one thing about your blog that can never be changed (without doing some url redirecting which is for advanced web experts only). Nearly everything else can be easily edited, fixed, or altered in some way.  Once you’ve registered a name, it’s pretty much a done deal.  So, you’d be wise to make sure you get this step right.

Criteria That Should Be Met When Picking A Domain Name

Every blog expert has slightly different ideas about picking a good domain name, but I’ll tell you the things that I personally take into consideration when I buy a domain name for a business blog.

  1. It should be short, if possible.  Three words or less is ideal.  Four is okay if one of the words is “a” or “in” or “the”.  Any more than four words and it will be hard for people to remember.  Do you really think a potential customer is going to remember your domain name if it’s something like JacksMowingandLandscapingServicesofOrlandoFlorida.com?  Of course not.  Instead, Jack would be better served to go with something easier to remember.  JacksMowingServices.com.  MowingByJack.com.  Better still: OrlandoLawnMowing.com.  Which leads me to criteria number two:
  2. If your services are specific to a city or geographic region, then the domain should have your city name in it, if possible.  This, more than anything, is for the benefit of the search engines so that they will send you more traffic and qualified leads.  One of the things that the Google algorithm takes into account when returning results for a search phrase is the text within the domain names of websites.  It uses the logic that if some or all of the text in the domain matches some or all of the text in the search phrase, then it’s a site that is more likely to give the user exactly what they’re looking for (whether it be information, products, or services).  If a user searches for “house painters in Memphis”, then all other variables being equal, Google is more likely to display results that have “Memphis” in the domain name than results (sites) that do not.
  3. It should have your most popular service in it, if possible.  This is for the exact same reason as #2.  If somebody searches for “house painting” in your area and your domain name has the words “house painting” or “house painters” or “house painter” in it then there is a much better chance that Google is going to give you a favorable location in the search results.  The higher you are in the search results, the greater the chance that a user will click on it, which lands them directly on your blog and gives you the opportunity to grab a new customer.
  4. Choosing a Domain Name for your Blog
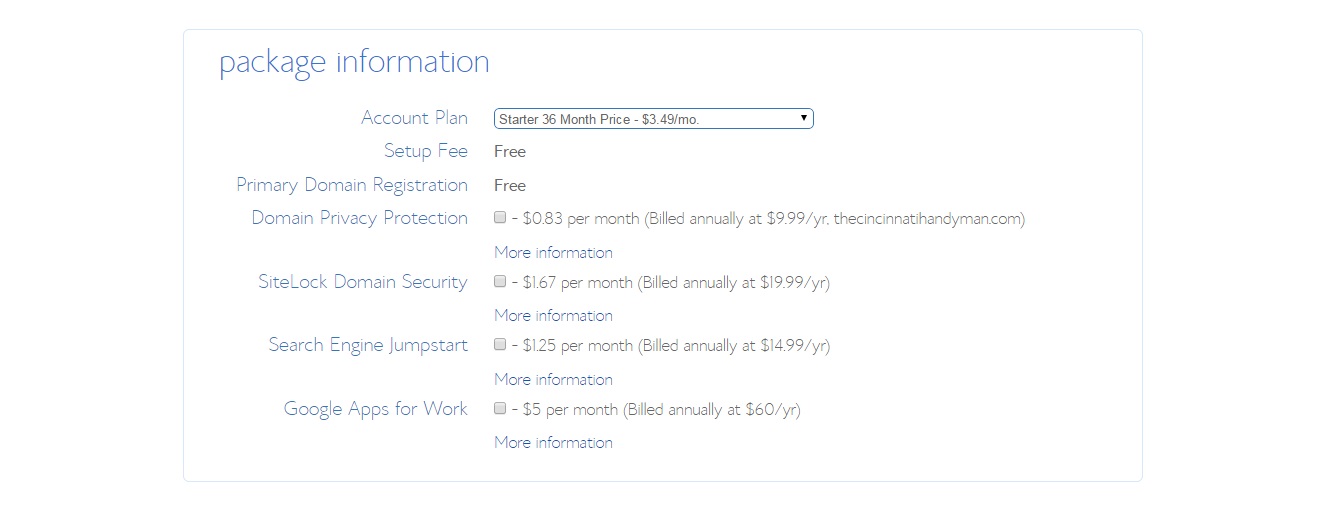
Try to get a .com, and stay away from hyphens.  Domain names that end with .net or .biz or .org extensions are at a disadvantage, in my view, because most people will forget the extension and assume it’s a .com.  If somebody at a party asks you what your website is and you say “HoustonWindowReplacement.NET” (maybe you had to settle on .net because the .com was taken), when that person goes to look for your website the next day I can almost guarantee that they will type in “HoustonWindowReplacement.COM”, which sends them to your competitor’s site, in all likelihood.  Epic failure.  Instead, try slightly different wording and go for a .com.  You could try ReplacementWindowsHouston.com or NewWindowsHouston.com or HoustonWindowInstallation.com.  For the same reason, I recommend staying away from hyphenated domain names.  Nobody will remember the hyphen!

It’s not always possible to nail all four of these criteria, but get as many as you can.  Some of these things might sound nit-picky, but it can mean the difference between a blog that just sends you the occasional lead and a blog that takes your business to a whole new level.

“But These Blog Name Ideas Aren’t Cool…”

It seems like I hear this a lot.  People think their blog domain name has to be clever or cutesy in some way, but for a business blog that targets a specific geographic region or service this simply isn’t the case!  In this situation you’re not trying to become the next big blogger about sports or politics or entertainment (in which case a more brandable name would be understandable); you’re simply trying to pull in more local leads for your service business.  Sticking your city name and service in the domain name might look a little ugly and weird at first, but it’s a necessary evil in my view.  Sure, if you can find a way to meet all of the above requirements AND make it sound good, too, then go for it!  But, I think you’ll find that this could be difficult.

Alright, so now I want you to write down a list of five or ten potential domain names for your business blog that meet all or most of the above four rules.  If you missed the first post in this series, then I recommend you go back and read it: How To Start A Successful Blog For Your Business.  If you have your list of contender domain names then you’re ready to move on to the next step in this series: Registering A Domain Name and Setting Up Blog Hosting.

{ 0 comments }